

If you’re looking for an all-in-one solution to record your screen and then edit your videos without switching between multiple programs, iTop Screen Recorder is a strong candidate. With its built-in video editor (sometimes referred to as iTop Video Editor) you can capture footage, make edits like trimming, adding transitions, filters, subtitles and more — all within one tool. Below is a detailed walkthrough of how to make the most of its editing capabilities — written in a style that feels like a human guide, with practical tips and a smooth flow.
Why Use an iTop Screen Recorder for Editing?
Before diving into the “how”, it helps to know why you might choose this tool. Some of the key benefits:
- It lets you record screens up to 4K resolution (2160p) and in common formats like 1080p, 720p too.
- It supports recording with face-cam and audio (microphone and system speaker) simultaneously, which is useful for tutorial videos, game footage, webinars etc.
- It includes a video editor built-in: you don’t have to export and open a separate editing program.
- The editor supports a variety of useful tools: trimming/splitting, merging, adding filters/transitions/text/music, changing aspect ratio for different platforms (16:9, 9:16, 1:1 etc).
- It supports exporting in multiple formats and resolutions (MP4, AVI, TS etc) and saving for social media.
With those in mind, let’s walk through step by step how you can edit videos in iTop Screen Recorder.
Record or Import Your Footage
- Download & Install: First, install iTop on your Windows PC (it supports Windows 7/8/10/11).
- Set Recording Preferences:
- Choose the recording area (full screen, window, or custom region).
- Turn on / off features like system speaker audio, microphone, webcam, mouse clicks or cursor highlight.
- Record: Click the REC button. Use the toolbar for drawing annotations (lines, arrows, circles) if needed.
- Finish Recording: Click stop (or press the hotkey) and the recorded file will appear in the “My Creations” section.
- Import Existing Footage: If you already have video clips you want to edit, you don’t have to record new ones. The editor supports importing external videos.
Choose Your Editor Mode – Quick or Advanced
Within the application, you’ll find two modes for editing:
- Quick Editor: Ideal for basic trims and simple edits. Easy and fast.
- Advanced Editor: Gives you more control — multiple tracks, timeline editing, effects, transitions, filters, subtitles, etc.
For most users editing tutorials, gameplays or social-media clips, Advanced Editor is recommended — but Quick Editor is handy for quick cuts.
Add Media to the Timeline
- Click Tools → Advanced Editor (or Quick Editor).
- Add Media: You’ll have a “media library” where you can drag and drop your recorded footage, images, audio files.
- Drag to Timeline: Drag your clips from the media library onto the timeline/tracks where you’ll arrange them.
Perform Core Edits (Trim, Split, Merge)
- Trim / Cut: Select a clip, move the play-head to where you want to cut, click the scissors icon to split. Delete unwanted sections.
- Merge / Combine: Arrange multiple clips in sequence and merge them into one video for smooth playback.
- Duplicate: If you want to reuse a clip, you can duplicate it in the timeline.
- Adjust Speed / Position / Size: You can modify clip speed (slow or fast), resize or reposition an overlay clip, adjust image/video size.
Enhance with Effects, Text, Transitions, Filters
To make the video more professional or engaging:
- Transitions: Insert between clips so the cut doesn’t look abrupt (fade, wipe, slide etc).
- Filters: Apply visual styles (vintage, black-and-white, cinematic) to give a unique look.
- Text & Subtitles: Add on-screen text, titles, captions or subtitles to help convey your message. Choose font, colour, size, position.
- Stickers & Special Effects: Add fun stickers or animations. Useful for tutorials or entertaining content.
- Background Music / Audio Editing: Add a soundtrack, voice-over, background music. Adjust levels, fade in/out.
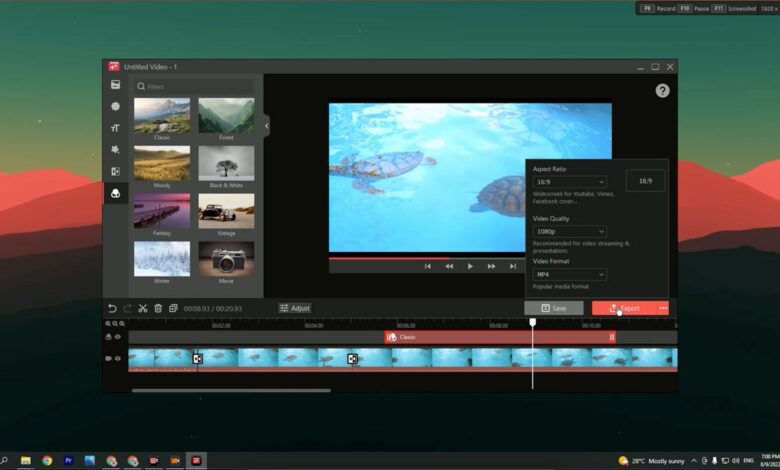
- Aspect Ratio & Output Format: If you are making content for Instagram Reels (9:16), YouTube (16:9) or square (1:1), you can set the aspect ratio accordingly.
Review & Fine-Tune
- Play back your edited sequence to check for smoothness.
- Make sure transitions are clean, audio is balanced (no abrupt volume changes).
- Ensure any text or annotations appear for enough time to be read.
- Use the preview tool in the editor to spot any issues before exporting.
Exporting Your Video
Once you’re happy with the edit:
- Click Save to save the project if you want to edit later.
- Click Export to render the final video. You’ll be prompted to select:
- Output format (MP4, AVI, TS etc)
- Resolution (720p, 1080p, 4K)
- Aspect ratio
- Once rendered, the file will be available in your chosen folder. You can then upload it to YouTube, Facebook, Instagram etc.
Bonus Tips for Better Editing Workflow
- Use hotkeys: Within the iTop Screen Recorder, you can set hotkeys for start/stop recording, pause/resume, screenshot, etc. This speeds up your workflow.
- Use “Denoise” / noise removal: If your recording has background noise, make use of built-in noise removal tools (when available) to clean up audio.
- Prepare your storyboard / script: Even though the tool makes editing easy, planning your recording, including where to cut or what transitions to use, will save you time later.
- Keep versions: If you’re making multiple versions (e.g., YouTube, Instagram), keep your project file so you can re-export in a different ratio/format.
- Optimize for your audience: For tutorials and how-to videos, lean on clear annotations, call-outs, zoomed-in views of key actions. For gameplays, consider keeping pacing tight and adding occasional commentary or text overlays.
Final Thoughts
Editing videos in iTop Screen Recorder gives you a seamless workflow: from screen capture → edit → export. Whether you’re creating tutorials, gameplay highlights, webinars, or social-media clips, the built-in editor provides a robust set of tools. While it may not have the full power of a professional non-linear editor like Premiere Pro or DaVinci Resolve, for many creators it offers exactly what is needed – especially when time and simplicity are important.
Give it a try: record a small clip, dive into the Advanced Editor, experiment with trimming, transitions, text overlays and export a short video. Once comfortable, you can build up to more complex edits.


